Get the Help You Need (in Rails)
8 Useful Helper Methods That Will Get the Ball Rolling on Your ROR Project
Thanks for the visit! Check out my work on GitHub or connect with me on LinkedIn.

In life, it’s not uncommon to want to do something by yourself. We can all be a little stubborn when it comes to reaching out for assistance right when it’s needed. Lucky for us, our bad habits aren’t being judged while working with Rails. In fact, the opposite is true, Rails is here to give us the help that’s needed, right when it’s needed!
When transitioning from working onActiveRecord to Ruby on Rails, I could finally let out a huge sigh of relief. Things were more intuitive, my code seemed to flow a bit better, Rails took out a lot of the brunt work for me and the best part- there are so many helpers! Using these built in helpers felt like having better communication skills, like being properly supported and able to do exactly what you want without breaking a sweat. It almost makes you feel like a better person… haha, ok maybe not, but it still sounds pretty great, right? Let’s get into it.

link_to
Use this in the show.html.erb to create a clickable link. Include the @variable_name or the info you want showing as your link, the path_name and finally the instance that this link should direct to

button_to
This works similarly to link_to, but it gives you more action and a button. On the show.html.erb file, you will first, name the button (what the user sees), give it an action instruction like ‘destroy’, give the :id of the item you want to alter and finally the desired method. Voila- a clickable, action button!

image_tag
Easily add an image to your show page by combining link_to and image_tag, followed by the desired url *I included the img_url in my seed data, so upon creation I could access it with @employee.img_url*

form_with
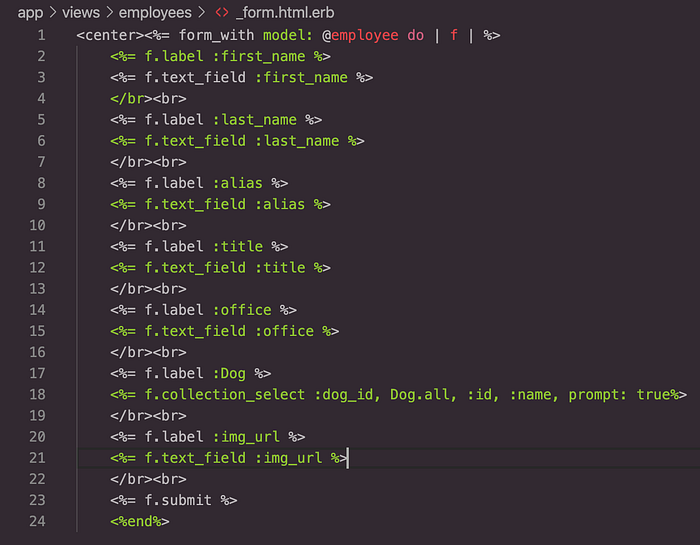
In your views >models >_form.html.erb: create a form to render in your edit.html.erb and new.html.erb by using <%=render ‘form’ %> You will need to include a model to bind this form with (@employee), next a label (what the user will see just before the text box), the text_field tells us in which column we will store the users input and the submit button to lock this inputted information in (you can also add a custom string label to the submit button, if desired)

collection_select (as seen on line 18 ^)
This creates a drop down selection box in your form) first, we use the :column_name, Model.all (or create a variable in your controller for this to call on- this is better practice), :id (what info we are holding onto on the back end), :name (what the user will see), prompt: true (will prompt the user to make a selection rather than immediately having an option selected)
form_for
If you find that form_with isn’t compatible with your version of Rails, the easy fix is to try form_for — it works just the same, just drop the ‘model:’

form_with as a basic search form
Use the GET method, give it a label, for the input ‘Search for:’, a text box for the user to type their search in and finally a submit button with the desired label ‘Search’ *This is just the form for a basic search, other logic will need to be implemented*

select_date
Use this date and time helper in your form to create drop down selection boxes with the year, month and day, respectively. Include your label just before to give more clarity to the user. In the example below I have included two for the start date and end date

There it is. Eight built-in helpers that Rails offers to stress less on your project. I hope this list has been enlightening to your coding journey and made you feel like you’ve leveled up.
As always, if you have more questions, feel free to leave a comment below or you can reference Rail’s documentation.


